Pages

Wednesday, March 31, 2010

forgive me

For the following rant.
(I'd like to see them do that)
I wasn't going to write a post on this subject, as I'd rather not dwell on the disappointments in my work, but I did start this blog as a diary to document the ups and downs of my learning experience/early career. I learnt today that the sales I made after the very successful evaluation last week were frowned upon by other members of staff. The particular individual is a relatively new employee, and so hasn't seen us progress from the beginning of our course, 14 months ago. She hasn't shown any interest whatsoever in our work, unlike most of the other staff, who regularly enquire about our projects. She doesn't understand how much work went into those pieces I sold. She thinks I was rude whilst negotiating a final price. If she knew how many hours of work went into making a piece like a teapot, she would see why you need to be confident in selling your work; if you allow yourself to be walked over and settle for a low price, you don't cover your costs or time, which makes earning a living near impossible.

Needless to say, I'm disgruntled.

Fortunately my buyers came to my defence; they understand why I spoke about my work in the way I did. It is not arrogance, just a secure knowledge of the value of my work.

Friday, March 26, 2010

handbuilt forms using advanced techniques

I started this unit a couple of weeks ago but was still so wrapped up in my tableware that I forgot to write about my progress. The brief for this project was pretty much "do whatever you like" because handbuilding can include any technique and could be functional and/or sculptural. That would ordinarily daunt me, but I knew instantly I wanted to do more wheel throwing (I sure do need the practice) and whilst researching found a suggestion to look towards nature for unusual constructions made from a repeated form. That made me delve into my beach combing jar (have I mentioned I live 2 minutes from Mermaid Beach?) to find this treasure...
Excuse the poor quality photo, it is a very small piece of coral
Which then inspired me to make something vaguely (emphasis on the vaguely) similar with wheelthrown cylinders. Thats 4 hours work up there. Cylinders are very very difficult. Not quite as hard as a teapot spout, but still super tricky.Arranged in order of height
*Hmm*
Then cut in a wave like form, much like the coral grows.
Coloured with bright underglazes as a nod to those beautiful tube corals in the reefs. I really hope nothing cracks apart during the firing...!

Thursday, March 25, 2010

my (super happy) creative space

Ah today has been a mighty good day. We had a group evaluation this morning for our teapots, including students from another class and their teacher, as well as the dean of the college (who we only see for assessments like this). I was super nervous and very frustrated because one of my lovely teapots had its lid stuck (see the bottom of this post) so I was one piece of work down. My classmate was in the same position but she managed to loosen her's minutes before we began the assessment. We also had to price our work for feedback which as any of you makers will know can be a bit stressful. As it turns out I had no need to worry - the dean walked in, declared the work to be beautiful and demanded to buy some of it immediately for the college collection! So as well as gaining a lot of interesting constructive criticism from my teachers and class mates, I scored $300 for the teapot below ($145), the Pagoda casserole dish ($85) and the smallest dish of this set ($70). HURRAH!
Pagoda Teapot - this one looks good AND pours well, hurrah!
Carved with a lino cutting toolWhite Willow Bird Teapot - looks great, pours badlyCobalt Glaze inside
This is the troublesome sticky lidded teapot, which both my teacher and myself managed to snap the handle of. Team work.

More lovely creative types all the way over here.

Wednesday, March 24, 2010

casseroles

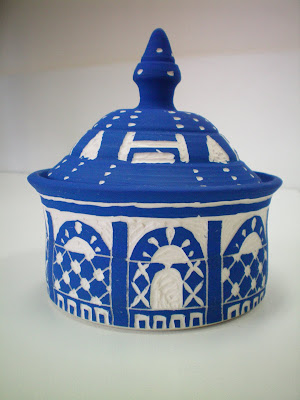
My casserole dishes came out of the kiln today, and I'm happy to say they are both quite successful. I'm looking forward to cooking in them! 
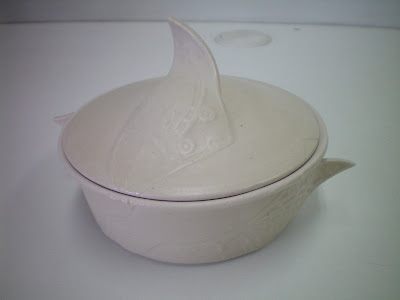
I didn't glaze the outside of this one to show off the carving better. As they're stoneware the body is vitrified and so water impermeable. I wasn't too sure about this design when I finished carving but its growing on me. It was a very different technique for me, with more freedom than a paintbrush. Messy can be good with carving.
This has matt glaze on the outside, so is VERY hard to photograph. Thats almost enough of a reason for me to not use it again. Aside from the iron spots I mentioned in my last post.
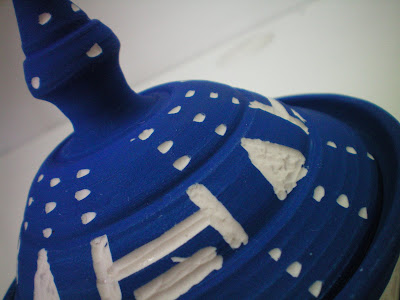
However I am very pleased with my relief work. I apply 2 layers of acrylic binder (you know the stuff that makes acrylic paint stronger?) to get the fine lines. The matt glaze shows it off nicely I think. What I'm 
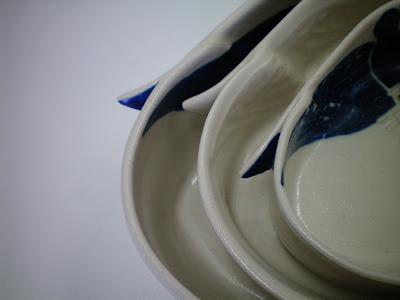
very pleased with is my cobalt glaze. You may remember I spent an afternoon making small portions of test glazes and this was one of them. It was very watery and just the correct consistency for roll glazing. I was very nervous when I applied this glaze as I knew any drips would stain, but I managed it just fine. If I do say so myself! Its just the clear gloss glaze with 2% cobalt added. I'll be using this again in the future me thinks.Another success story this term has been my stamp. It was a pain to make but so worth it. I've used this signature since I was 14 and started painting ceramics at my local studio back in the Isle of Man. I loved the artwork of Cicely Mary Barker from a very young age and emulated her mark on my own work (I intended to insert a picture here of her signature, but blogger isn't very friendly when you want to add a photo at the bottom of a post. Grr). Its so nice to see how far this mark has come with me. My Mum used to tell me off when I didn't sign my work haha. Thanks Mum!

nestling tableware

A few more photos of the Willow Bird nestling tableware. I'm having difficulties taking good photos of my work at the moment, maybe it has something to do with all the white? My previous pots have been more colourful. 
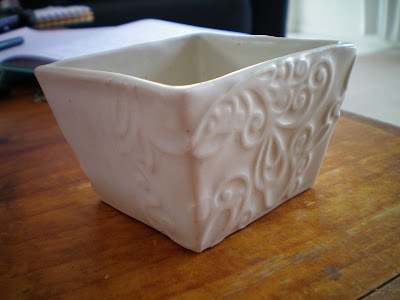
I think I should have made the middle bird blue too. I used Walker's PB103 Stoneware clay for this set, the casserole dishes and the teapots. We would usually use Walker's No 10 but we couldn't get any soft enough. I think this clay is slightly more off-white than the No 10 is which is annoying as I my designs needed a lot of exposed clay. Also, the matt white glaze we mixed up must have some tiny iron deposits through it as the pieces with that glaze have ugly brown spots all over them. Tis annoying! They look like bad 70's pottery. This is one of the downfalls of working in a common studio; there may only be 3 of us, but its hard to know what we'll all used and if we use and clean it properly. Maybe one day I will have my own studio :)
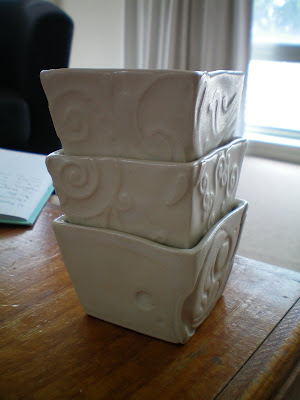
Sunday, March 21, 2010

extra

These are just a few slipcast pots I made before Christmas to tide me over the summer holidays. They finally got fired last week. As there are only 2 ceramic students at my college it takes us a good while to fill a kiln with work, and its terribly wasteful energy-wise to fire a half empty kiln. Matt White Glaze

Thursday, March 18, 2010

my creative space

Aaaand thats all I can show you today, as I haven't had a chance to take some photos in good light. I'm quite pleased with everything though!

More creative spaces, with quite possibly more photographs than me, over here at Kootoyoo's.

Wednesday, March 17, 2010

pretty pots

Our kiln firing was pretty successful. My test pots turned out quite well I think...
Relief, carving, scraffito, slip trailing, underglaze colour, clear gloss and matt white glazes.

more feathers

I'm scanning rainbow lorikeet feathers this morning with a plan to turn them into ceramic decals. I think these birds are just amazing, all those colours in one feather! I've got a big bowl filled with them, collected from the park at Burleigh Heads .

Saturday, March 13, 2010

sitting on the fence

My wonderful ceramics teacher has leant me a wheel :) I gave it a good clean today and can't wait to give it a go. I might wait until our downstairs neighbours are at work as I'm worried the vibrations might be noisy through their ceiling...then again, we can feel their ceiling fan through our floor, so it might make us even. I love that I can have all my new herbs next to me when I throw, when I get frustrated (that happens a lot) I can play with the leaves and let the gorgeous scents calm me.
I've spent the day so far decorating this spare set of nestling tableware with my interpretation of the fence from the willow pattern.

I'll be adding some willow pattern decals to some of the fence panels after they've been glazed.

Friday, March 12, 2010

here's my handle, here's my spout

Today was teapot decorating day!
Underglaze paint and scraffito
The pagoda-ish one was carved with a lino cutting tool again

And the round one is relief work!

Thursday, March 11, 2010

my creative space

I spent a great deal of today finishing off this casserole dish, mostly with a lino cutting tool. We set the kiln for a glaze firing this afternoon, so its prayers to the kiln gods tonight!
Mmm cute clay cuttings
Does it look like a pagoda from the willow pattern? Its s'posed to...


More creative-ness over here, thanks Kirsty!

Friday, March 05, 2010

hello, teapots

My oh my, no one told me how difficult teapots are to make. Thats about 5 components that need to be made, trimmed, joined and monitored to avoid drying out. Needless to say, I'm knackered.


I actually made 4 teapots in all, but was so frustrated with them by the end of the day I only got one photo of a finished one.

Monday, March 01, 2010

birds of a feather

I'll run out of good bird titles soon! Whilst beginning to apply my first bird design, I took this first picture then realised the inside of the fold could be painted and would line up with the wing.
Clever, huh?Nice foot shot thereI'm starting to get excited about this set now. I was very unsure about it in the beginning. Its a project that seems to continuously grow.